
News

News

AC Drainage Motor vs DC Drainage Motor: Key Differences Explained

Both AC drainage motors and DC drainage motors have their own advantages. AC drainage motors remain a reliable and economical choice for applications requiring stable operation and simple installation. DC drainage motors provide greater flexibility, efficiency, and control capability, making them increasingly suitable for modern intelligent equipment. What Is a Drainage Motor? A drainage motor is a compact electric motor designed to drive a drainage pump or water removal mechanism. Its main function is to convert electrical energy into mechanical power, allowing the pump to move condensate water, wastewater, or other liquids away from equipment. Drainage motors are commonly found in: Air conditioning units Refrigeration systems Dehumidifiers Washing machines Industrial cooling equipment Medical equipment Commercial water management systems Although the operating principle is similar to other electric motors, drainage motors usually require special characteristics such as: Stable operation under frequent starts and stops Compact size Low noise output Resistance to moisture and humidity Long service life under continuous operation The choice between AC and DC technology mainly depends on the electrical design of the equipment and the required control performance. Basic Difference Between AC and DC Drainage Motors The fundamental difference between AC and DC drainage motors is the type of electrical power they use. An AC drainage motor uses alternating current with periodic directional changes. These motors are commonly connected directly to household or industrial AC power supplies, such as 110V, 220V, or 380V systems. A DC drainage motor uses direct current flowing in a single direction. These motors typically work with lower-voltage DC power sources, such as 12V, 24V, or 48V systems, often supplied through adapters, batteries, or power conversion modules. This difference influences their structure, efficiency, control method, and application range. Comparison AC Drainage Motor DC Drainage Motor Power Supply AC voltage directly DC voltage through power supply Common Voltage 110V, 220V, 380V 12V, 24V, 48V Control Method Usually fixed-speed operation Easier speed and performance control Structure Simple and durable More compact with electronic control Efficiency Good for stable operation Generally higher efficiency at variable loads Typical Use Industrial and commercial equipment Compact and intelligent equipment AC Drainage Motor: Advantages and Applications Simple Structure and Reliable Operation One of the biggest advantages of AC drainage motors is their simple mechanical structure. Traditional AC motors usually contain fewer electronic components compared with modern DC motor systems. This makes them highly reliable, especially in applications where the motor only needs to perform a basic drainage function. For example, in a commercial air conditioning system, the drainage motor may only need to start when condensate water reaches a certain level. A simple AC motor can complete this task efficiently without requiring complex control systems. The reduced electronic complexity also means fewer potential failure points, which can be beneficial in harsh industrial environments. Direct Connection to Standard Power Systems Many buildings and factories already use AC power infrastructure. Because of this, AC drainage motors can often be installed without additional power conversion equipment. This provides several benefits: Easier installation Lower initial equipment cost Reduced system complexity Convenient replacement during maintenance For large commercial equipment manufacturers, AC motors remain a practical choice because they can be integrated into existing electrical designs. Stable Performance for Continuous Operation AC drainage motors are particularly suitable for applications requiring consistent operating speed. For example, a drainage system that continuously removes condensate water from an industrial cooling unit usually does not need frequent speed adjustments. In this situation, a reliable AC motor can provide stable performance for long periods. Typical AC drainage motors may operate continuously for thousands of hours when properly designed and maintained. DC Drainage Motor: Advantages and Applications Higher Efficiency in Variable Operating Conditions DC drainage motors have become increasingly common because modern equipment often requires better energy management. Unlike traditional fixed-speed AC motors, DC motors can adjust operating speed according to actual demand. When drainage requirements are low, the motor can operate at reduced speed, reducing unnecessary energy consumption. For example, a smart dehumidifier may not need maximum drainage capacity all the time. A DC drainage motor can automatically adjust output based on water generation conditions, improving overall efficiency. In applications with frequent load changes, DC motors can achieve noticeable energy savings compared with fixed-speed alternatives. Compact Design and Flexible Installation DC motors are generally easier to design into compact equipment because they can achieve high power density with smaller dimensions. This makes them suitable for: Portable cooling equipment Compact refrigeration systems Household appliances Battery-powered devices Mobile equipment As equipment manufacturers continue developing smaller and smarter products, the demand for compact DC drainage motors has increased. Better Speed Control and Intelligent Functions One major advantage of DC drainage motors is their compatibility with electronic control systems. Through controllers or integrated circuits, DC motors can provide functions such as: Variable speed operation Soft start Overload protection Automatic adjustment Remote monitoring compatibility These features are especially valuable in modern equipment where drainage performance needs to be optimized according to real-time conditions. Performance Comparison: AC vs DC Drainage Motor When comparing actual performance, neither AC nor DC drainage motors are universally better. Selection depends on specific application needs. Performance Factor AC Drainage Motor DC Drainage Motor Energy Efficiency Suitable for constant operation Better for variable operation Speed Adjustment Limited Excellent Noise Control Good Usually better with optimized control Maintenance Simple structure Requires electronic components Initial Cost Lower Usually higher System Integration Easier with AC systems Better for smart equipment Energy Consumption Comparison Energy efficiency matters more as manufacturers seek lower operating costs. Assuming two drainage motors provide similar pumping capacity: An AC motor may operate continuously at a fixed speed. A DC motor can adjust speed based on drainage demand. For a system running 10 hours per day, a DC motor that reduces average operating power by approximately 20%–30% could significantly reduce annual electricity consumption. However, this advantage depends on operating conditions. If the motor always needs to run at full capacity, the energy difference may become smaller. Therefore, selecting a DC motor only for efficiency reasons
Drainage Motor vs Drain Pump
News

Drainage Motor vs Drain Pump: What Is the Difference?

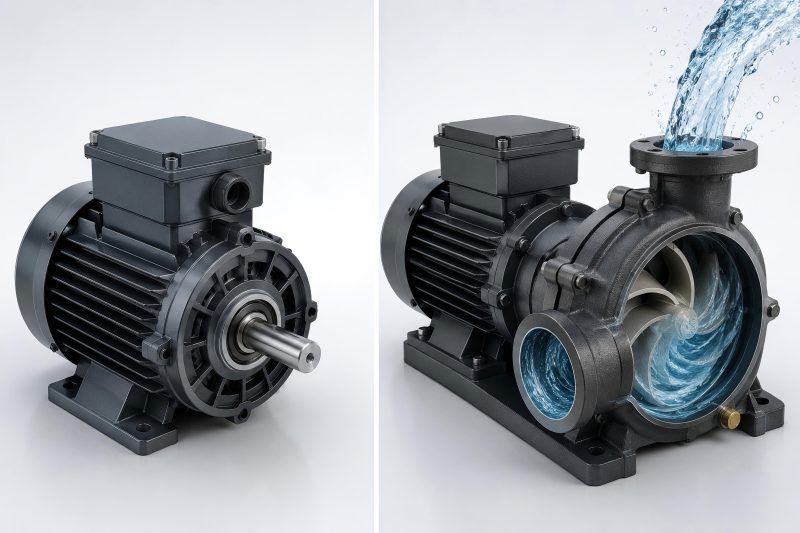
A drainage motor powers the system, while a drain pump moves and removes water. The drainage motor provides the power, while the drain pump performs the actual water transfer. In many compact applications, they operate as one integrated system, which is why the terms are frequently confused. What Is a Drainage Motor? A drainage motor is an electric motor designed to provide the rotational force required for water drainage applications. Its primary function is not to move water directly, but to convert electrical energy into mechanical rotation. This rotational movement is then transferred to a pump mechanism, usually through a shaft connection. A typical drainage motor consists of: Stator Rotor Shaft Bearings Housing Electrical terminals Protection components When electrical power is supplied, the motor creates torque and rotates the shaft. The connected impeller or pump structure then moves water through the drainage system. In appliance applications, drainage motors are commonly used in compact drainage assemblies where space, noise, and reliability are important factors. For example, in a washing machine: Electrical power → Drainage motor rotation → Pump impeller rotation → Water discharge The motor supplies the force needed for drainage. What Is a Drain Pump? A drain pump is a complete mechanical assembly designed to remove water from a system. Unlike a drainage motor, a pump directly interacts with water. It includes not only the motor but also the hydraulic components required to create water flow. A typical drain pump includes: Component Function Motor Provides rotational power Impeller Converts rotation into water movement Pump housing Guides water flow Inlet and outlet ports Connect water pipelines Sealing system Prevents water leakage The pump moves water through impeller rotation. The rotating blades generate centrifugal force, pushing water from the inlet side toward the outlet side. A drainage pump is therefore a complete water-handling solution rather than only a power unit. Different drainage pump designs may be selected depending on flow rate, water conditions, and installation requirements. Drainage Motor vs Drain Pump: Key Differences Although they are closely related, the main difference is their role in the system. Comparison Drainage Motor Drain Pump Main Function Generates mechanical power Moves and discharges water Works With Pump mechanism Water system Contains Hydraulic Parts No Yes Main Parameter Voltage, power, speed, torque Flow rate, head pressure, capacity Replacement Method Replace motor component Replace complete pump assembly Application Component supplier level System/application level Simply explained: A drainage motor is the engine. A drain pump is the complete machine that uses the engine to move water. How Do They Work Together? In many drainage applications, the motor and pump cannot work independently. The working process is: 1. Electrical Input The control system sends electricity to the drainage motor. The motor starts rotating according to its designed speed and torque requirements. 2. Mechanical Power Transfer The rotating shaft transfers power to the pump impeller. The motor determines whether the pump can achieve stable and continuous operation. 3. Water Movement The impeller creates pressure differences inside the pump chamber. Water enters from the inlet and exits through the discharge port. This is why the performance of a drain pump depends heavily on motor characteristics. A motor with insufficient torque may cause: Slow drainage Pump blockage Unstable operation Higher failure rates A properly matched motor can improve: Drainage efficiency Operating reliability Noise performance Service life Why Are They Often Confused? The confusion results from different sales methods and application contexts. In household appliances, manufacturers often provide a complete drain pump assembly. Customers usually replace the entire unit instead of purchasing only the motor. For example, when a washing machine has drainage problems, the replacement part is usually called a “washing machine drain pump,” even though the motor inside is the actual power source. In industrial supply chains, however, manufacturers may focus specifically on drainage motors because they produce the core drive component. This difference in terminology depends on the perspective: User Perspective Common Term Appliance repair Drain pump Appliance manufacturer Drain pump assembly Motor manufacturer Drainage motor Component engineer Motor drive unit Performance Comparison: Motor-Level vs Pump-Level When selecting components, buyers should consider different performance factors. Drainage Motor Performance Factors For a drainage motor, important specifications include: Parameter Typical Consideration Voltage 12V, 24V, 110V, 220V Power Approximately 10W–100W for compact applications Speed Commonly several thousand RPM depending on design Noise Important for household appliances Durability Continuous start-stop cycles The motor needs to provide stable torque while maintaining low energy consumption. For appliance makers, efficiency and durability matter more than maximum power. Drain Pump Performance Factors A drain pump is usually evaluated by hydraulic performance. Important parameters include: Parameter Meaning Flow Rate Amount of water discharged per unit time Head Height Maximum vertical lifting capability Water Temperature Range Operating environment Particle Handling Ability to tolerate impurities Leakage Protection Sealing performance A pump used for clean appliance water has different requirements from a pump handling wastewater or industrial drainage. Application Differences Household Appliances This is one of the most common applications for compact drainage motors and drain pumps. Examples: Washing machines Dishwashers Ice machines Water treatment equipment These applications usually require: Compact size Low noise High reliability Frequent start-stop operation For example, a washing machine drain system may only operate for several minutes during each cycle, but it may repeat thousands of times during the product lifetime. Commercial and Industrial Drainage Industrial drainage systems normally focus more on pump capacity rather than small motor design. Applications include: Building drainage Basement water removal Equipment cooling drainage Industrial wastewater handling These systems usually require: Higher flow capacity Longer operating time Stronger protection Larger pump structures Compared with appliance drainage motors, industrial drainage pumps often place more emphasis on hydraulic performance and environmental resistance. Which Fits Your Needs? For Appliance Manufacturers If you are designing washing machines, dishwashers, or similar products, you usually need a drainage motor solution. The key considerations are: Installation space Voltage compatibility Noise requirements Torque performance Lifetime cycles A customized drainage motor can help optimize the complete drainage system. For System Integrators If you

Single Rotor vs Dual Rotor Axial Flux Motors
News

Single Rotor vs Dual Rotor Axial Flux Motors: Which Design Is Better?

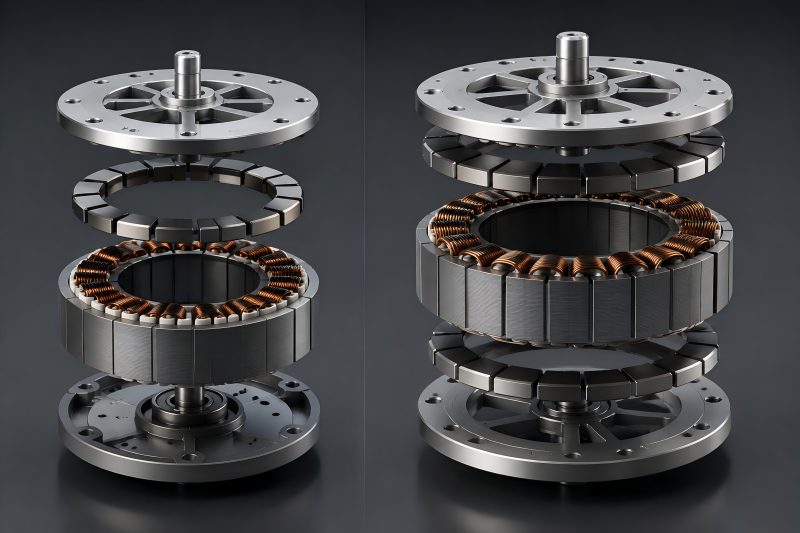
Single rotor and dual rotor axial flux motors represent two different design philosophies. The single rotor design emphasizes simplicity, cost control, and easier production, making it suitable for many commercial and industrial applications. The dual rotor design focuses on maximizing torque density, improving force balance, and supporting higher performance requirements. For applications requiring the highest power density within limited space, the dual rotor structure has clear advantages. However, for large-scale manufacturing where reliability, cost, and production consistency are equally important, a single rotor design may provide a better overall solution. Basic Structure Difference Between Single Rotor and Dual Rotor Axial Flux Motors The main difference between these two designs is the number and arrangement of rotors around the stator. A single rotor axial flux motor features one rotor and one stator, with magnets on the rotor interacting with stator windings through a single air gap to produce torque. A dual rotor axial flux motor uses two rotors positioned on both sides of the stator. The stator is located between the two rotors, creating two active air gaps. This structure allows magnetic forces to act from both sides, improving magnetic utilization and mechanical balance. Structure Single Rotor Axial Flux Motor Dual Rotor Axial Flux Motor Rotor quantity One rotor Two rotors Air gap One active air gap Two active air gaps Stator position One side of rotor Between two rotors Axial length Compact Slightly longer Torque density High Generally higher Manufacturing complexity Lower Higher Cost More economical Higher The single rotor structure focuses on simplicity and cost efficiency, while the dual rotor structure focuses on maximizing performance within limited space. Performance Comparison: Torque Density and Power Density One of the biggest reasons engineers choose axial flux motors is their ability to achieve high torque density. The flat and wide magnetic path allows more active material to participate in torque generation. A dual rotor design naturally has an advantage because the stator interacts with two magnetic fields. The electromagnetic force is distributed on both sides of the stator, allowing better utilization of copper and permanent magnets. Performance Factor Single Rotor Design Dual Rotor Design Torque output High Very high Power density High Higher Magnetic utilization Good Excellent Rotor force balance Moderate Better Suitable applications General compact systems High-performance systems However, higher performance does not always mean better overall value. In applications where motor size and weight requirements are moderate, the additional performance of a dual rotor design may not justify the increased manufacturing difficulty. For example, a compact industrial actuator may already meet its requirements with a single rotor motor. Adding a second rotor could increase cost without creating meaningful system benefits. Mechanical Balance and Air Gap Control Proper air gap control significantly affects axial flux motor operating performance. In a single rotor motor, the magnetic attraction force between the rotor and stator acts mainly in one direction. This creates an axial force that must be supported by the bearing system and mechanical structure. A dual rotor motor naturally balances these forces because the two rotors pull the stator from opposite directions. This reduces axial magnetic imbalance and can improve mechanical stability. Mechanical Factor Single Rotor Dual Rotor Axial force balance Requires additional support Naturally balanced Bearing load Higher consideration required Reduced axial load influence Assembly tolerance Easier More demanding Air gap adjustment Simpler More critical Although dual rotor designs have better force balance, they require more precise assembly. The distance between both rotors must be controlled carefully because uneven air gaps can reduce efficiency and create vibration. Therefore, dual rotor motors offer better mechanical behavior, but only when manufacturing accuracy is well controlled. Thermal Management Considerations Heat management is another important difference between the two designs. In a single rotor motor, heat generated inside the stator has fewer cooling paths. The rotor side may provide limited heat transfer depending on the structure. For continuous high-load operation, thermal design becomes a key challenge. A dual rotor motor exposes both sides of the stator to rotating components, creating more opportunities for heat transfer. Some designs also use the rotor structure as part of the cooling solution. Thermal Factor Single Rotor Dual Rotor Stator cooling surface Limited Larger effective area Continuous power capability Moderate to high High Thermal design difficulty Lower Higher High-load operation Depends strongly on cooling More suitable However, the cooling advantage of dual rotor motors depends on the actual design. Simply adding another rotor does not automatically solve thermal problems. Cooling channels, housing design, material selection, and operating conditions still determine the final temperature performance. Manufacturing Difficulty and Cost Comparison From a manufacturing perspective, single rotor motors are easier to produce. The stator assembly, rotor assembly, magnet placement, and final alignment process are relatively straightforward. Fewer components also mean fewer potential sources of production variation. Dual rotor motors require tighter control over: Rotor parallelism Air gap uniformity Magnet positioning Stator alignment Assembly fixtures These additional requirements increase production complexity. Manufacturing Aspect Single Rotor Dual Rotor Number of components Fewer More Assembly process Simpler More complex Tooling requirements Lower Higher Production yield control Easier More demanding Manufacturing cost Lower Higher For prototype development, dual rotor designs can be attractive because they demonstrate excellent performance. However, when moving toward mass production, manufacturers must consider whether the performance improvement can offset the additional production investment. Application Suitability Comparison The best design depends heavily on the application. Single rotor axial flux motors are often suitable for applications where compact size, reliability, and reasonable cost are priorities. Examples include industrial equipment, compact drive systems, robotics, and some electric mobility applications. Dual rotor axial flux motors are more suitable for applications where maximum torque density and efficiency are critical. These include high-performance electric vehicles, aerospace systems, and advanced mobility platforms. Application Requirement Recommended Design Low manufacturing cost Single rotor Compact structure Single rotor Maximum torque density Dual rotor High continuous power Dual rotor Easier maintenance Single rotor Premium performance systems Dual rotor Motor specifications alone should not determine the selection. System-level requirements such as available installation

News

Axial Flux Motor Manufacturing Process: From Core Design to Final Assembly

The manufacturing process of an axial flux motor involves much more than assembling a compact motor structure. From core design and lamination processing to winding, rotor assembly, and final testing, every stage influences the final performance. For manufacturers, the key is to achieve a balance between advanced motor design and practical production methods. A reliable axial flux motor requires not only strong electromagnetic performance but also accurate manufacturing control, stable assembly processes, and consistent quality inspection. Axial Flux Motor Core Design and Engineering Preparation The manufacturing process begins with a detailed design review. Before any tooling or production preparation, engineers need to define the motor’s electrical requirements, mechanical structure, and manufacturing route. The axial flux motor core usually requires tighter control of magnetic paths because the axial structure has a shorter magnetic circuit and a larger influence from air gap variation. Small dimensional changes in the stator or rotor can directly affect torque output, efficiency, and vibration performance. The main design factors include: Design Factor Manufacturing Consideration Motor diameter Determines available torque area and core size Air gap distance Requires precise control to maintain magnetic performance Stator structure Affects lamination production and winding process Rotor configuration Influences magnet fixing and balance requirements Cooling method Determines housing and assembly design Compared with conventional motors, axial flux motors often have a thinner and more compact structure. This creates advantages in weight reduction but also increases manufacturing sensitivity. A design that performs well in simulation may still face challenges during mass production if tolerances, tooling, or assembly methods are not considered early. For this reason, manufacturing feasibility should be included during the initial design stage. The best-performing design on paper is not always the easiest design to produce consistently. Manufacturing of Axial Flux Motor Stator Core The stator core is critical for axial flux motor performance and production. It provides the magnetic path and supports the winding system. However, its manufacturing method can be more complicated than traditional radial motor stators. Depending on the motor structure, axial flux stators may use segmented laminations, ring-shaped laminations, or customized core structures. Electrical steel is usually selected according to efficiency requirements, operating frequency, and loss limitations. The main manufacturing steps include: Electrical steel material preparation Lamination cutting or stamping Lamination stacking Insulation treatment Core fixing and inspection For small-batch production or prototypes, laser cutting may be used because it provides flexibility for design changes. However, laser cutting can introduce different edge conditions compared with stamping, which may influence magnetic performance. For volume production, stamping is usually preferred because it provides higher consistency and better production efficiency. The challenge is that axial flux motor laminations often have unique geometries, requiring accurate tooling design. Manufacturing Method Advantages Limitations Laser cutting Flexible for prototypes and small quantities Higher processing cost for mass production Stamping High efficiency and repeatability Requires dedicated tooling Bonded core process Reduces mechanical stress and improves shape flexibility Needs controlled bonding conditions A key point in axial flux motor manufacturing is that the core should not only meet dimensional requirements but also maintain magnetic properties. Excessive mechanical stress, poor stacking accuracy, or improper joining methods can increase losses. Axial Flux Motor Winding and Stator Assembly After the stator core is prepared, the winding process becomes another critical manufacturing stage. Because axial flux motors usually have a compact axial structure, available winding space can be limited. The winding design must consider copper filling factor, heat dissipation, insulation distance, and production accessibility. Common winding considerations include: Winding Parameter Impact on Motor Performance Copper fill rate Affects current capacity and torque output Insulation thickness Influences safety and thermal resistance Winding arrangement Determines electromagnetic performance Connection method Affects reliability and production efficiency The assembly process requires careful control because axial flux motors usually have smaller axial dimensions than traditional motors. Incorrect positioning of coils or uneven pressure during assembly can create unwanted air gap differences. In production, automated winding equipment can improve consistency, but custom axial flux designs may still require specialized fixtures. The balance between automation and flexibility depends on production volume. Rotor Manufacturing and Magnet Installation The rotor is another major component that determines axial flux motor performance. Most axial flux motors use permanent magnets installed on the rotor surface to generate the required magnetic field. The rotor manufacturing process generally includes: Rotor plate machining Magnet positioning Magnet bonding or mechanical fixing Rotor balancing Final inspection Magnet positioning accuracy is especially important. Even small deviations between magnets can affect magnetic symmetry and create torque ripple or vibration. Rotor balance is also critical because axial flux motors often operate at high speeds. Mass imbalance causes vibration, mechanical stress, and reduced durability. Rotor Manufacturing Step Main Quality Concern Plate machining Flatness and dimensional accuracy Magnet installation Position consistency Bonding process Adhesion strength and durability Balancing Vibration control A practical consideration during manufacturing is the choice of magnet fixing method. Adhesive bonding offers a compact structure, while mechanical fixing may provide additional security for demanding applications. The selection depends on speed, temperature, and operating environment. Precision Control During Motor Assembly The final assembly stage determines whether individual components can work together as a complete motor. Axial flux motors require precise rotor-stator air gap uniformity. Since magnetic forces act strongly across the axial direction, uneven gaps can significantly reduce performance. Key assembly controls include: Assembly Item Required Control Rotor-stator alignment Prevent uneven magnetic force Air gap consistency Maintain stable torque output Shaft positioning Reduce vibration Fastener tightening Avoid deformation During assembly, manufacturers should measure not only final motor performance but also intermediate components. For example, checking the stator core before winding and after assembly can help identify whether deformation occurs during processing. This type of process control is especially important for custom motors because production issues are often caused by small accumulated errors rather than one obvious defect. Testing and Quality Inspection of Axial Flux Motors Before shipment, axial flux motors require electrical, mechanical, and performance testing. Typical inspection items include: Test Item Purpose Insulation resistance test Verify electrical safety No-load operation

News

How to Match an Outrunner BLDC Motor with the Right Controller

Matching an outrunner BLDC motor with the right controller requires more than simply checking voltage and power. You need to consider voltage range, continuous current, peak current, sensor type, KV value, pole pairs, startup load, battery capacity, control method, heat dissipation, and protection functions. For light-load and high-speed applications such as fans, propellers, and drones, a sensorless controller may be simple and effective. For heavy-load, low-speed, or precision applications such as electric vehicles, robotics, and industrial equipment, a sensored or FOC controller is usually the better choice. Basic Motor Parameters Before selecting a controller, collect the key specifications of the outrunner BLDC motor. Common motor parameters include: Parameter Meaning Why It Matters Rated voltage Normal working voltage Must match controller and battery voltage Rated current Normal operating current Controller must support continuous current Peak current Short-time maximum current Controller must handle acceleration and overload Rated power Output power capacity Helps determine controller size KV value RPM per volt with no load Affects speed range Pole pairs Number of magnetic pole pairs Important for speed feedback and controller compatibility Sensor type Hall sensor, encoder, or sensorless Determines controller control mode Application load Fan, wheel, propeller, pump, etc. Affects current demand and startup torque If the motor datasheet is available, use it as the main reference. If not, you need to estimate based on motor size, winding, voltage, and intended load. Match the Voltage Correctly Voltage matching is the first and most important step. The controller rated voltage should match the motor rated voltage and the battery or power supply voltage. For example, if your outrunner BLDC motor is rated for 48V, you should choose a controller designed for 48V systems. Common BLDC system voltages include: Motor Voltage Common Applications 12V Small fans, small pumps, model equipment 24V Robotics, AGV modules, small electric tools 36V Electric scooters, light mobility equipment 48V E-bikes, industrial drives, larger robots 60V / 72V High-power electric vehicles and heavy-duty systems A controller with too low a voltage rating may fail when connected to a higher-voltage battery. A controller with a much higher voltage rating may work, but it may not provide ideal efficiency or low-speed performance if not configured properly. You should also consider battery voltage range. For example, a 48V lithium battery may reach about 54.6V when fully charged. The controller must tolerate the maximum charged voltage, not only the nominal voltage. Match Continuous and Peak Current Current determines torque. Outrunner BLDC motors draw extra current during startup, acceleration, and heavy-load conditions. Therefore, the controller must support both continuous current and peak current. A basic matching rule is: Controller continuous current should be equal to or slightly higher than the motor rated current. Controller peak current should be high enough to support short-time overload. For example: Motor Rated Current Recommended Controller Continuous Current Recommended Peak Current 10A 10–15A 20–30A 30A 30–40A 60–80A 60A 60–80A 120A or higher Do not select a controller only by peak current. Some controllers advertise a high peak current but cannot maintain stable continuous operation. For industrial or long-duty applications, continuous current rating is more important. If the controller current is too small, the motor may feel weak, accelerate slowly, or trigger overcurrent protection. If the controller current is too large and not properly limited, the motor may overheat under heavy load. Check the Power Rating Power is related to voltage and current. The approximate input power can be calculated as: Power = Voltage × Current For example, a 48V motor running at 30A uses about 1440W of input power. Considering efficiency loss, the actual mechanical output power may be lower. When matching a controller, make sure its power capacity is suitable for the motor and application. Motor Power Recommended Controller Power Range 250W 250–350W 500W 500–750W 1000W 1000–1500W 3000W 3000–4000W For applications with frequent acceleration, climbing, impact load, or heavy startup torque, choose a controller with some power margin. Match Sensorless or Sensored Control Outrunner BLDC motors may be sensorless or sensored. A sensorless outrunner motor does not use Hall sensors or position sensors. The controller estimates rotor position through back EMF. Sensorless control is simple, compact, and cost-effective. It works well for fans, propellers, pumps, and applications where the motor starts with light load. A sensored outrunner motor detects rotor position through Hall sensors or encoders. This allows smoother startup, better low-speed torque, and more accurate control. It is better for electric vehicles, robotics, conveyor drives, wheel motors, and heavy-load startup. Control Type Advantages Best For Sensorless Simple wiring, lower cost, compact Fans, drones, pumps, propellers Hall sensored Better startup, stronger low-speed torque E-bikes, scooters, wheels, robots Encoder control High precision, accurate speed/position Servo systems, automation, robotics If your motor has Hall sensor wires, choose a controller that supports Hall sensors. If your motor has no sensor wires, choose a sensorless controller. Some advanced controllers support both modes. Consider the Control Method Different applications require different controller functions. Do not choose a controller only because it can spin the motor. It should also support the control method your system needs. Common control methods include: Control Method Description Suitable Applications PWM speed control Speed adjusted by PWM signal Fans, pumps, automation Throttle control Speed controlled by analog throttle E-bikes, scooters, vehicles CAN communication Digital control and monitoring Robotics, AGV, industrial systems UART / RS485 Parameter setting and communication Smart equipment, automation FOC control Smooth and efficient vector control High-performance drives Square wave control Simple and low-cost Basic electric drive systems For simple applications, a standard BLDC speed controller may be enough. For high-end applications, choose a controller with FOC control, current limiting, regenerative braking, communication interface, and programmable parameters. Pay Attention to KV Value and Speed Range The KV value of a BLDC motor means the approximate no-load RPM per volt. For example, a 100KV motor running on 48V may reach about 4800 RPM without load. Outrunner motors usually have lower KV and higher torque than inrunner motors. When selecting a controller, make sure it can support the motor’s electrical speed.

News

Outrunner vs Inrunner BLDC Motor: What Is the Difference?

Outrunner and inrunner BLDC motors are both efficient and reliable brushless motor solutions, but they are designed for different needs. An outrunner BLDC motor has an external rotating shell and delivers higher torque at lower speed. It is widely used in drones, fans, gimbals, e-bikes, and direct-drive systems. An inrunner BLDC motor has an internal rotor and is better suited for high-speed operation, better heat dissipation, and compact industrial designs. It is commonly used in power tools, pumps, compressors, spindles, and automation equipment. What Is an Inrunner BLDC Motor? An inrunner BLDC motor has a rotor located inside the stator. The inner magnet rotor spins as surrounding stator windings create a rotating magnetic field. This design resembles conventional motor layouts, and its compact, lightweight rotor allows inrunner motors to achieve much higher rotational speeds. Inrunner BLDC motors are commonly used in applications that need: High rotational speed Compact motor size Good heat dissipation Precise speed control Gearbox or transmission matching Pros Cons High-speed capability Lower direct torque Better heat dissipation Often needs gearbox for high torque Compact cylindrical design Gearbox may increase noise and cost Fast dynamic response Less suitable for direct-drive propellers Good for continuous operation Higher RPM may require careful balancing Typical applications include electric tools, pumps, compressors, CNC spindles, model boats, industrial automation, and some electric vehicle systems. What Is an Outrunner BLDC Motor? An outrunner BLDC motor has a rotor located outside the stator. The central stator remains stationary, while the outer magnet-mounted casing rotates around it. With a wider rotating shell, an outrunner delivers stronger low-speed torque, making it ideal for direct-drive systems. Outrunner BLDC motors are commonly used in: Drones and UAVs RC aircraft Electric bicycles Cooling fans Direct-drive systems Gimbals Robotics joints Low-speed high-torque applications Pros Cons High torque at low speed Lower maximum speed Good torque-to-weight ratio Cooling can be more difficult Suitable for direct drive Larger rotating outer shell Often no gearbox needed Higher rotational inertia Ideal for drones, fans, and e-bikes Not ideal for very high-speed systems The main feature of an outrunner motor is its strong torque output without always needing a gearbox. Basic Structural Difference The biggest difference between an outrunner and an inrunner BLDC motor is the position of the rotor. Item Inrunner BLDC Motor Outrunner BLDC Motor Rotor position Inside the stator Outside the stator Stator position Outside Inside Rotating part Inner shaft/rotor Outer shell/can Speed Higher Lower Torque Lower at same size Higher at same size Cooling Usually better More challenging Common use High-speed systems Direct-drive torque systems In simple terms, an inrunner is better for speed, while an outrunner is better for torque. Torque Comparison An outrunner BLDC motor usually produces more torque than an inrunner motor of similar size because its rotor has a larger diameter. A larger rotor radius gives the motor greater leverage, allowing it to generate stronger turning force. This is why outrunner motors are widely used in drones. Drone propellers need strong torque at relatively low speed, and an outrunner motor can drive the propeller directly without a gearbox. Inrunner motors usually deliver less direct torque. If high torque is needed, they are often paired with a gearbox. The gearbox reduces speed and increases torque. Speed Comparison Inrunner BLDC motors are usually better for high-speed operation. Since the rotor is smaller and lighter, it has lower rotational inertia. It enables quicker acceleration and speed adjustment. Outrunner motors usually run at lower speeds because the outer rotating shell is larger and heavier. At very high speed, the larger rotating mass can create more mechanical stress. For this reason, inrunner motors are often used in high-speed tools, pumps, spindles, and compressors. Outrunner motors are more common in low-speed or medium-speed applications where torque is more important than maximum RPM. Efficiency Comparison Both outrunner and inrunner BLDC motors can be highly efficient when properly designed and matched with the right controller. However, efficiency depends on many factors, including: Motor size Winding design Magnet quality Controller performance Load condition Cooling method Operating speed Outrunner motors can be very efficient in direct-drive applications because they may not need a gearbox. Removing the gearbox reduces mechanical losses, noise, and maintenance. Inrunner motors can also be highly efficient, especially at high speeds. But when a gearbox is required, total system efficiency may be affected by gear friction and transmission loss. Heat Dissipation In an inrunner BLDC motor, the stator windings are located near the outer housing. Since most motor heat is generated in the windings, this structure helps transfer heat to the motor case more easily. As a result, inrunner motors usually have better cooling performance. The stator sits inside the rotating outer casing. The heat source is more enclosed, which can make cooling more difficult. Some outrunner motors rely on airflow from rotation, ventilation holes, or external cooling design to control temperature. For continuous heavy-duty operation, cooling should be carefully considered, especially when using an outrunner motor. Size and Weight Outrunner motors often provide high torque in a compact axial length. Their short and wide structure makes them suitable for applications where strong torque is needed but motor length is limited. Inrunner motors are often longer and narrower. They are suitable for compact cylindrical spaces and high-speed systems. For drones, outrunner motors are popular because they offer excellent torque-to-weight ratio. For electric tools and pumps, inrunner motors are often preferred because their shape fits better inside narrow housings. Control and Response Both motor types require an electronic speed controller, also known as an ESC or BLDC driver. Inrunner motors generally have lower rotor inertia, so they can respond quickly to speed changes. They are ideal for precise high-speed control. Outrunner motors have higher inertia because the outer shell rotates. This can make acceleration and deceleration slower compared with inrunner motors. However, the higher inertia can also provide smoother rotation in some applications. For precision applications, the final performance depends not only on motor type, but also on the encoder, controller algorithm, load condition, and mechanical design. Noise and

News

How to Match a Synchronous Motor with a Gearbox

Matching a synchronous motor with a gearbox is not only about connecting two mechanical parts together. The right combination must meet your required speed, torque, load type, duty cycle, installation space, efficiency target, and safety factor. If the motor is too small, the system may fail to start, overheat, lose synchronism, or trip under load. If the gearbox is not selected correctly, it may suffer from high wear, vibration, backlash, oil leakage, or premature gear failure. Synchronous Motor and Gearbox Matching Matching Factor What to Check Why It Matters Output speed Required machine speed Determines gearbox reduction ratio Output torque Load torque demand Ensures the system can drive the load Motor power kW or HP rating Prevents overload and overheating Gear ratio Motor speed ÷ output speed Controls final shaft speed Service factor Load shock and duty cycle Protects gearbox from damage Mounting type Foot, flange, shaft-mounted Ensures mechanical compatibility Shaft size Motor shaft and gearbox input Avoids coupling and alignment issues Efficiency Motor and gearbox losses Affects energy use and heat Backlash Gear clearance Important for positioning accuracy Environment Dust, moisture, temperature Affects sealing, lubrication, and protection Understand the Required Output Speed The first step is to know the speed required by your driven machine. A synchronous motor speed depends on frequency and pole count. The gearbox reduces this motor speed to the working speed needed by the equipment. Basic Formula Gear ratio = Motor speed ÷ Required output speed For example, if your synchronous motor runs at 1500 rpm and your machine needs 100 rpm: Gear ratio = 1500 ÷ 100 = 15:1 This means you need a gearbox with a reduction ratio close to 15:1. Common Motor Speed and Gear Ratio Examples Motor Speed Required Output Speed Approx. Gear Ratio Typical Application 3000 rpm 300 rpm 10:1 Small automation equipment 1500 rpm 150 rpm 10:1 Conveyor drive system 1500 rpm 100 rpm 15:1 Mixer or feeder 1000 rpm 50 rpm 20:1 Heavy-duty conveyor 750 rpm 30 rpm 25:1 Rotary table or slow drive Calculate the Required Output Torque Torque is critical when pairing a synchronous motor with a gearbox. The gearbox reduces speed but increases torque. This allows a smaller high-speed motor to drive a lower-speed, higher-torque load. Basic Torque Formula Torque = 9550 × Power ÷ Speed Where: Torque is in N·m Power is in kW Speed is in rpm For example, if the motor power is 5.5 kW and the gearbox output speed is 100 rpm: Torque = 9550 × 5.5 ÷ 100 = 525.25 N·m This means the gearbox output torque should be higher than 525 N·m after considering efficiency and safety factor. Choose the Correct Motor Power The synchronous motor power should match the load demand. If the motor power is too low, the motor may fail to start, run with high current, lose synchronism, or overheat. If the motor power is too high, the system cost increases and energy efficiency may become poor under light load. When selecting motor power, check: Starting torque requirement Continuous running torque Peak load torque Load inertia Working hours per day Number of starts and stops Shock load level Ambient temperature Cooling condition For stable loads, such as fans or pumps, the required power is usually easier to calculate. For shock loads, such as crushers, mixers, presses, or heavy conveyors, you need a higher safety margin. Select the Right Gearbox Ratio Once motor and output speeds are clear, choose the gearbox ratio. However, the exact standard gearbox ratio may not match your calculation perfectly. In that case, choose the closest standard ratio and check whether the final output speed is acceptable. Example Motor speed: 1500 rpm Required output speed: 120 rpm Required ratio = 1500 ÷ 120 = 12.5:1 If standard gearbox ratios are 10:1, 12:1, 15:1, and 20:1, a 12:1 ratio may be more suitable if the machine can accept a slightly higher output speed. Check Gearbox Output Torque Capacity Do not only check the gear ratio. You must also check whether the gearbox can handle the required torque. A gearbox with the correct ratio but insufficient torque rating may fail quickly. You should compare: Required load torque Gearbox rated output torque Peak torque capacity Service factor Overload capacity Thermal rating For heavy-duty use, the gearbox rated torque should be higher than the calculated torque after applying a service factor. Consider the Service Factor The service factor is a safety multiplier used to protect the gearbox from real working conditions. A machine that runs smoothly for 8 hours per day needs a lower service factor than a machine that works 24 hours per day with shock loads. Suggested Service Factor Reference Working Condition Load Type Working Time Suggested Service Factor Light duty Smooth load Less than 8 hours/day 1.0–1.2 Medium duty Moderate load 8–16 hours/day 1.2–1.5 Heavy duty Shock load 16–24 hours/day 1.5–2.0 Severe duty Frequent impact Continuous operation 2.0+ For example, if your calculated torque is 500 N·m and the service factor is 1.5: Required gearbox torque = 500 × 1.5 = 750 N·m So you should select a gearbox rated for at least 750 N·m. Match the Motor Starting Characteristics Synchronous motors have different starting requirements compared with standard induction motors. Some synchronous motors use damper windings, VFD control, soft starters, or special starting systems. When matching a gearbox, you must make sure the gearbox and driven load do not create excessive starting resistance. Check these points: Can the motor start the load through the gearbox? Is the load too heavy during startup? Is the load inertia too high? Does the motor need unloaded starting? Is a clutch or soft start system needed? Will the gearbox experience high shock during starting? For high-inertia loads, the motor may need a longer acceleration time or a different starting method. Check Load Type and Application Different applications require different gearbox types. A conveyor may use a helical gearbox or shaft-mounted gearbox. A precision automation system may require a planetary gearbox. A lifting system may need a worm gearbox

News

10 Common Synchronous Motor Problems and Solutions

Synchronous motors are widely used in pumps, compressors, fans, mills, conveyors, and other industrial drive systems that require constant speed, high efficiency, and stable operation. However, problems can still appear during installation, commissioning, or daily use. Common synchronous motor problems include starting failure, loss of synchronism, overheating, abnormal vibration, excitation faults, high current, poor power factor, bearing damage, and insulation failure. Understanding the symptoms, causes, and solutions helps you reduce downtime, protect equipment, and improve motor reliability. Common Synchronous Motor Problems Problem Common Symptoms Main Causes Quick Solution Motor fails to start No rotation, humming, trip alarm Wrong wiring, low voltage, starter fault Check power supply, wiring, starter, and control circuit Loss of synchronism Motor trips under load, unstable operation Overload, voltage drop, weak excitation Reduce load, check voltage, adjust excitation Overheating High frame temperature, insulation smell Overload, poor cooling, high current Improve ventilation, reduce load, inspect current Abnormal vibration Noise, shaking, loose foundation Misalignment, bearing wear, rotor imbalance Align shaft, inspect bearings, tighten base High current Overload trip, cable heating Mechanical overload, voltage imbalance Check load, power supply, and motor parameters Poor power factor Low efficiency, penalty risk Incorrect excitation setting Adjust excitation current Excitation failure Motor cannot synchronize AVR, exciter, brush, or field circuit fault Inspect excitation system and field winding Bearing problems Grinding noise, high bearing temperature Poor lubrication, contamination, misalignment Lubricate or replace bearings Insulation failure Ground fault, leakage current Moisture, aging, dust, overheating Dry, clean, test, or rewind motor Synchronous Motor Fails to Start A synchronous motor may fail to start if the power supply, starting system, excitation system, or load condition is not correct. In many cases, the motor may produce a humming sound but cannot rotate normally. Common Causes Supply voltage is insufficient. Phase loss or wrong phase sequence. Incorrect wiring connection. Starter, contactor, or protection relay failure. Load is too heavy during starting. Damper winding or starting cage is damaged. Control circuit has loose terminals or faulty sensors. Solutions First, check the incoming voltage and make sure all three phases are stable. Then inspect the motor wiring according to the nameplate and wiring diagram. If the motor uses a soft starter, VFD, or special starting panel, check the parameter settings and protection alarms. You should also make sure the driven equipment can rotate freely before starting. If the load is jammed, even a healthy motor may fail to start. Motor Loses Synchronism Loss of synchronism is one of the most serious problems in synchronous motors. It happens when the motor cannot maintain its magnetic lock with the rotating stator field. The motor may slow down, vibrate, draw high current, or trip suddenly. Common Causes Sudden mechanical overload. Large voltage drop in the power system. Excitation current is too low. Incorrect load angle. Poor power supply stability. Starting process is not completed correctly. Faulty excitation control system. Solutions Reduce the load and restart the motor under proper conditions. Check whether the excitation current reaches the required value after starting. If the motor is used in a heavy-duty application such as a compressor, mill, or large pump, avoid sudden load changes. Also inspect the power supply for voltage dips, phase imbalance, and unstable frequency. Synchronous Motor Overheating Overheating can damage insulation, shorten motor service life, and cause unplanned shutdowns. A motor that runs hotter than normal should be inspected quickly. Common Causes Long-term overload operation. Cooling fan failure or blocked ventilation. Dust buildup inside the motor. High ambient temperature. Voltage imbalance. Excessive current. Bearing friction. Incorrect excitation setting. Solutions Measure the motor current and verify it against the rated current shown on the nameplate. Clean dust from cooling channels, fan covers, and air filters. Make sure the motor has enough space for heat dissipation. If the motor is installed in a dusty, humid, or high-temperature environment, improve the enclosure protection and cooling design. Abnormal Noise and Vibration Noise and vibration usually indicate mechanical or electrical problems. If ignored, they can lead to bearing failure, shaft damage, coupling damage, or rotor-stator rubbing. Common Causes Shaft misalignment. Loose foundation bolts. Damaged bearings. Rotor imbalance. Coupling wear. Air gap unevenness. Driven equipment vibration. Electrical imbalance. Solutions Check the motor base, foundation bolts, and coupling alignment. Inspect the bearing temperature and listen for grinding or knocking sounds. If vibration increases after maintenance, the coupling or rotor may need balancing. You should also check whether the vibration comes from the motor itself or from the connected machine. High Current During Operation High current is a warning sign. It may come from electrical problems, overload, poor excitation, or mechanical resistance. Long-term high current can overheat windings and damage insulation. Common Causes Motor is overloaded. Driven equipment is blocked or jammed. Supply voltage is too low. Voltage imbalance between phases. Incorrect excitation current. Bearing friction increases mechanical load. Motor parameters do not match the application. Solutions Measure the three-phase current and voltage. When one phase shows abnormal current, inspect the power supply and cable connections. If all phases are high, inspect the load condition. For pumps and fans, check whether valves, dampers, or process conditions are causing excessive load. Poor Power Factor One advantage of a synchronous motor is that its power factor can be adjusted by changing excitation current. If the excitation is not set correctly, the motor may operate with a poor power factor. Common Causes Under-excitation. Over-excitation. Incorrect AVR setting. Load changes without excitation adjustment. Fault in field current control. Solutions Adjust the excitation current according to the required power factor. Under-excitation usually causes lagging power factor, while over-excitation can make the motor operate with leading power factor. For plants using synchronous motors for power factor correction, regular monitoring is important. Excitation System Failure The excitation system powers the rotor field with DC. If the excitation system fails, the synchronous motor may not start properly, may fail to pull into synchronism, or may trip during operation. Common Causes AVR failure. Exciter fault. Brush or slip ring wear. Field winding open circuit. Field circuit short circuit. Loose wiring in excitation

Scroll to Top

Send Message

    We are a manufacturing factory to provide you with high-quality B2B services. Welcome to batch customer consultation. Our company has a minimum order quantity requirement, which needs to be greater than or equal to 500 pcs. (the minimum order quantity of different products is different) Please be sure to inform the order quantity so that we can reply to your information.

    Please fill out the form below and we will contact you as soon as we receive the feedback. The fields marked with “*” are required

      We are a manufacturing factory to provide you with high-quality B2B services. Welcome to batch customer consultation. Our company has a minimum order quantity requirement, which needs to be greater than or equal to 500 pcs. (the minimum order quantity of different products is different) Please be sure to inform the order quantity so that we can reply to your information.